
Joy -o- Meter
Joy O Meter was developed in collaboration with Culture Lab LIC and immersive concert creators Truth & Magic. The general goal was to reconnect audiences with live music experiences through playful, sensory interactions, bridging the gap between digital technology and intimate, real-world experiences. Most importantly, it can visually track and aggregate collective joy in real-time.
Field
Physcial Design, Interactive installtion
Tools
Rhino, CNC, Woodshop fabrication, electrical soldering
Time
2024.9 - 12
Group project
My Role:
Led the structure Design and industrial design process.
Grouped with:
Proejct Manager: Linna Zhou, Melika Panbehchi
Designers: Elaine Wang, Samamtha Cui, Georgia Chen, Kyrie Yang
Developers: Lening Hou, Alan Ren, Lucia Gomez


Client needs

Our Collaborative Partner: Truth & Magic
Project type: Immersive Concert Experience
Key features: Interactive sensory stations, live performance audience engagement.
Target Audience:
-
Ages 18–45
-
Regular concert-goers and technology users
-
Interested in immersive and interactive theatrical experiences
-
Seeking deeper, offline connections in digital-heavy lives
What we know:
Sensory Stations: Audiences interact through multi-sensory games (sight, sound, taste, touch, smell) to unlock initial joy levels.
Live Performance:: Real-time collective joy measurements through dancing, sing-a-longs, parachute play, bubble machines, and immersive dance performances.
Research & Ideation

Round 1: Concept Brainstorming
Each team member contributed at least three ideas based on the research.
We compared and grouped similar concepts, ranking them into categories for feasibility and creative potential. This initial sorting helped us identify emerging themes.
Round 2: Thematic Clustering
Ideas were further clustered into overarching themes to guide our future design direction. This thematic framework became the foundation for all later decisions.


Ideas were further clustered into overarching themes to guide our future design direction. This thematic framework became the foundation for all later decisions.
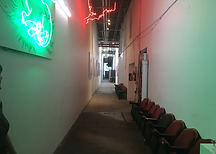
Site Visit & Spatial Understanding
Our team visited Culture Lab LIC to understand the physical constraints of the venue. We studied the floor plan, ceiling height, elevations, and mounting limitations to ensure our design would be feasible and safe within the space.


Concept Pitching & Selection
Based on our research, ideation, and site visit, we developed three distinct design concepts to pitch to the client.


-
The cassette-inspired design was selected as the final direction.
... is a network of whimsical, illuminated sculptures that transportjoy from input stations to a central hub sculpture, shaped like a cassette. As joy accumulates, the hub sculpture shows increasing levels of lights.
As the concert unlocks, the hub will be fully lit. It will be lit alongwith the peripheral tubes, as if it’s radiating joy to audiencesaround the venue.


The input station design.
As the performance requirements evolved, we continuously refined the concept through multiple meetings with the client.
🔋 Structural Design & Prototyping
Structure design shift 2 versions
The Main cassette design changed due to a shift of placement in the show. The clients want it to be placed high-up.


I though about building the first design in Arcylic or similar material, but due to the needs change, the design changed


The final structure and look is 7 feet tall.
Prototyping & Playtesting
We created a full-scale(but only 5 feet tall) cardboard prototype to test the LED effect with projection mapping.


🔋 Final Design Adjustments

Structure update:
- The central body part is designed to be heavy enough to balance the weight.
The front panel was chosen to be built in Plexiglass because of its transparency and ability to allow LEDs to shine through.
- The front panel can be removed for future adjustments and maintenance needs.
I adjust multiple times with the development team to make sure there is enough room for the electrical parts.


Structure update:
The connection parts of the main body and legs are also adjusted to provide a stronger bond.


The final design was tailored for future reuse, with a modular system and transportable case to allow the client to assemble it independently.
The final design was tailored for future reuse, with a modular system and transportable case to allow the client to assemble it independently.

The cases are the base.
Once it is taken apart, the base of the cassette isar altered into the protecting case to protect the surface of the plexigalss.
🔋 Fabrication Process
Shaper to cut layers of the body of the cassette
We cut the entire shape out of pieces of 3/4 inch plywood
Assamble
Then we assamble the rings together to form a hollow shape which can contain the electrical parts, aka big battery, wires.


Sand. sand. sand
After multiple rounds of glue ups, I sand the structure for the paint application.
Ps. Lots of small tasks not included here. but if you know, you know 😭
The LED holder pannel

The plexiglass engraving
The plexigalss with LEDs

We CNCed some foam for testing, since we only got one chance, no room for mistakes.
Since we only got two plexiglasses, we have to carefully test it.
After we engrave the entire panel, we test out whether the LEDs on the side would shine up the board or not.
Testing out the LEDS, and code
The LED and the plexiglass
our talented developers led the process of the code, then we tested with the physical parts.
YAY!
Our final assamble before the delivery to client !